
Inside a 1,700-SKU HVAC Photo Project (Part 1: The Challenge & the Plan)

When most people think about product photography, they picture a few items on a white background and a half-day shoot.
This project is the opposite of that.
For the past several months, I’ve been photographing roughly 1,700 individual HVAC products—each one with a 45-frame 360° spin, still images, and a 4K video loop—for a large national manufacturer under the DuraVent umbrella.
I’m a commercial photographer based in Grand Rapids, Michigan, with my main studio in the city. For this project, I also leased and built out a dedicated 360° product photography studio in the upstairs warehouse space at Howies Hockey in Caledonia, just south of Grand Rapids. That Caledonia studio has functioned as a full-time production space specifically for this high-volume 360° and e-commerce product photography project.
This post is the first in a short series where I break down what it actually takes to pull off something like this. My goals are simple:
Give manufacturers, marketers, and e-commerce teams a realistic look at what’s involved in high-volume 360° product photography
Share how I planned the project so it didn’t collapse under its own weight
Part 1 is about the challenge and the plan. In Part 2, I’ll walk through the studio setup and workflow in more technical detail.
Who the Client Is- and What the Project Involved
DuraVent and its family of brands manufacture HVAC and venting products that end up in homes and commercial buildings across North America. Their products appear on major retail websites like Lowe’s, Home Depot, and Menards, along with countless HVAC distributors and supply houses.
That kind of reach is great for business, but it creates a real headache when it comes to product imagery:
Different retailers had different images for the same SKU
Some products had outdated photography
Others had no usable product photos at all
There was no single, consistent visual standard across thousands of SKUs
If you’re running e-commerce in 2025, that’s a serious problem. Customers expect clear, accurate, trustworthy images—especially for technical products that have to fit and function correctly.
This project is their answer to that problem: a ground-up rebuild of their product image library, designed to serve internal teams, big-box retailers, and smaller distributors with consistent, reliable visuals.
For me, it’s also a flagship example of the kind of industrial and HVAC product photography I provide for manufacturers across the U.S., not just here in West Michigan.
The Scope: 1,700 SKUs, 360° Spins, Stills, and Video
On paper, “1,700 SKUs” is just a number. In real life, it looks like this:
Around 1,700 individual products
45 images per 360° spin for each SKU
Additional stills for hero images, thumbnails, and detail shots
A 4K spin video recorded for each product as a backup and alternate asset
Very quickly, you’re into tens of thousands of files that all need to be:
Lit consistently
Framed consistently
Named correctly
Organized in a way their teams can actually use
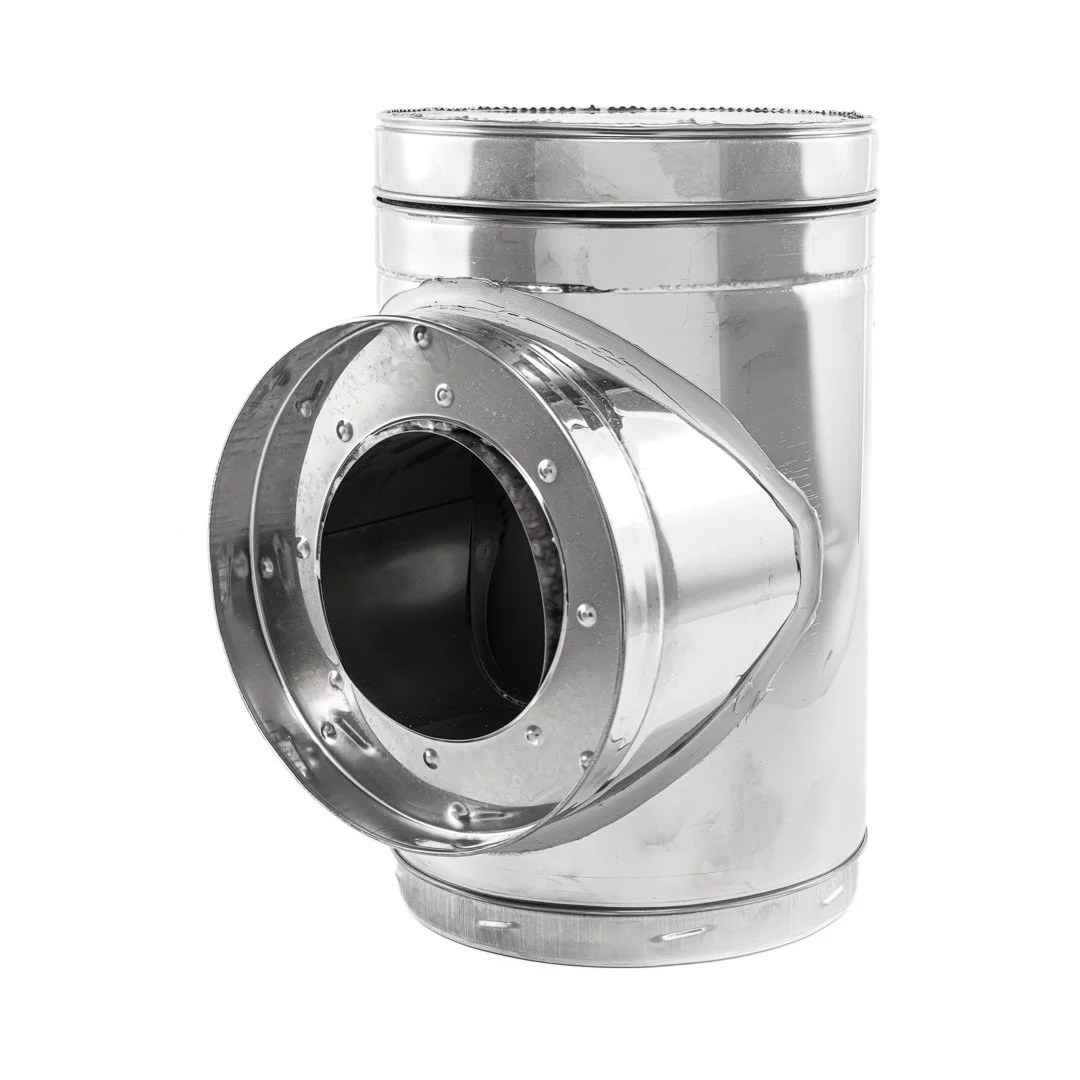
HVAC components also aren’t “easy” products to photograph:
Lots of metal, reflections, and curved surfaces
Plenty of white, sand, black, and galvanized finishes on a white background
Complex shapes that need to be understood from multiple angles
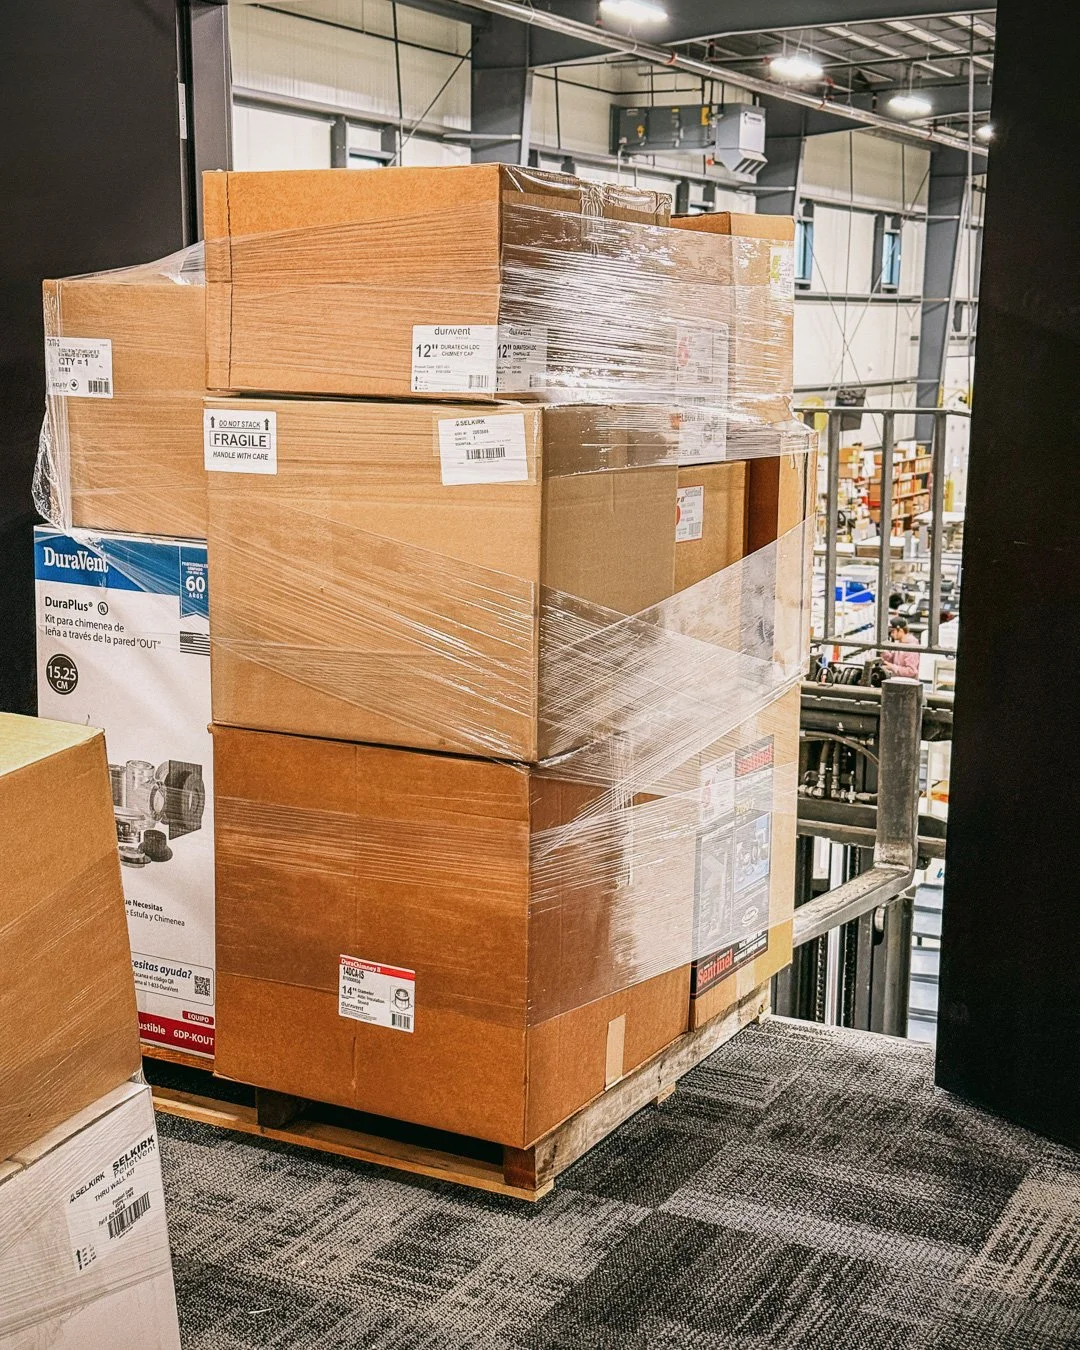
And they’re not arriving one at a time. They’re coming in on pallets, rolling through a working warehouse, and being moved up into the studio. That’s a good problem to have—but if you don’t have a tight plan, it will steamroll you.
Real-World Complexity: Kits, Finishes, Stickers, Mess, Damage and Retouching
Beyond the sheer volume, there are the little (and not-so-little) realities that don’t show up on a spreadsheet. This is where 360° e-commerce product photography for manufacturers gets interesting.
A huge range of colors and finishes
Not everything is simple white-on-white. Across the DuraVent brands I’ve been working with, the products span:
White, sand, and black finishes
Aluminum, painted, powder-coated, stainless steel, and galvanized surfaces
Each of those behaves differently under studio lighting, especially when you’re trying to keep backgrounds clean and consistent while still showing true color and finish. It’s a constant balancing act between accuracy and simplicity.
Kits instead of single parts
A big chunk of the project hasn’t been single items at all—it’s kits.
Think of a pellet stove installation kit: instead of one part, a single SKU might include 12–15 individual pieces in one box. To photograph those properly, there are really three jobs built into one SKU:
Assembly or partial assembly so the product actually makes sense visually
A full kit shot that shows everything together in one image—almost like photographing the front of the packaging, but in a clean, consistent studio style
Individual close-up images of each component so installers and buyers can clearly see what’s included
Assembly and layout weren’t the headline challenge going in, but they became a very real, very time-consuming part of the workflow. It’s not difficult work—it’s detailed work. And it’s necessary if you want the images to genuinely help the end user.
Labels, stickers, and multi-brand products
When a company sells under multiple brands, the same physical part might appear in more than one catalog.
For example, a 4" × 7" white grill might be sold under DuraVent, but also under another brand within the family. In practice, that meant:
Every item arrived with stickers, labels, and barcodes
For the images to be flexible across brands, those labels either had to be carefully removed or retouched out
On one product, that’s manageable. On a project where a single SKU equals 45 images in a 360° spin plus stills, even a small amount of retouching multiplies quickly. It’s one of those invisible steps that adds a lot of time but makes the final image library far more versatile.
Grease, oil, and the realities of manufacturing
This is HVAC hardware, not fashion. Many parts come straight from manufacturing with some amount of oil or grease still on them. That’s completely normal for this industry, but from a photo standpoint it means:
Frequent cleaning of products, turntable covers, and the backdrop
Swapping or washing surfaces more often to keep the white background looking like white—not “warehouse gray”
It’s one of those ongoing maintenance tasks that doesn’t show up in a shot list, but it definitely shows up in the time it takes to keep everything looking professional.
Damage, no-shows, and duplicates
When pallets are shipping from locations all over North America, not every item arrives in perfect condition. Some pieces get damaged in packaging or in transit. Others are packed incorrectly, duplicated, or—very occasionally—don’t arrive at all.
To handle that responsibly, I put a system in place to:
Identify and flag damaged items as soon as they reach the studio
Photograph and document damage clearly for the client
Keep a running list of:
Items that arrived damaged and couldn’t be photographed
Items that were supposed to arrive but hadn’t yet
Duplicate items that didn’t match the manifest
That information is then relayed back to the client in a concise, organized way so their team can decide whether to send replacements, adjust the catalog, or handle it another way.
Thankfully, the number of true no-shows on this project has been small. But the system to track, document, and communicate those exceptions is a really important part of keeping a project of this scale on the rails.
Retouching: the part that takes longer than shooting
From the outside, it’s easy to assume the hard part is pressing the shutter. On this project, retouching often takes longer than photographing.
Very rarely can I walk up to the turntable, set a product down, and run a spin. Most of the time, parts need help to sit at the right angle or present cleanly:
I’m suspending pieces with fishing line
Using small supports or props to hold parts upright
Positioning products in ways that make sense visually and technically
That solves the presentation problem—but it creates another:
Every bit of fishing line, every support, every little helper needs to be patched out in all 45 frames of the 360° spin, plus any stills
When you multiply that across hundreds of SKUs, retouching becomes a massive portion of the time investment. Combined with dust cleanup, sticker removal, and small manufacturing marks, it’s one of the main reasons the “after the shoot” portion of the work is every bit as important as the capture itself.
The Constraints and Non-Negotiables
Before I agreed to take this on, we spent time defining what “success” actually meant. A few of the non-negotiables were:
Clean, consistent white backgrounds
Images suitable for major retailers and internal use, with no distracting gradients or color casts.Accurate color and finish
Close enough isn’t good enough when components need to match existing systems or finishes.Repeatable angles and presentations
360° spins that feel smooth and consistent from product to product, and still images that follow a predictable structure (main view, alternate, detail).Straightforward file delivery
Folder structures and filenames that make sense for their web and marketing teams and can drop into existing systems without a lot of renaming.
There were also practical constraints:
A tight timeline for a project this large
Products arriving in waves, on pallets, not all at once
A workflow that made sense both in my Grand Rapids studio and in the dedicated warehouse studio in Caledonia
So the bar was high, the volume was massive, and the margin for chaos was small. That’s exactly where planning matters most.
How the Warehouse Studio Came to Life
While this project was coming together, I was also in conversations with Howies Hockey, a local company based in Caledonia. They were exploring ways to improve their own product imagery and were considering building an in-house studio inside their warehouse.
Those conversations planted a very useful idea. Howies already had:
Upstairs office space that could be converted into a studio
A pallet door up into that space
Loading docks and warehouse infrastructure to easily move large volumes of product
At the same time, as the DuraVent project grew, we were talking about how many pallets I could realistically receive and store. It became clear that running everything through my main Grand Rapids studio wasn’t going to be the most efficient way to handle that much product.
So I proposed a different approach:
I would lease the upstairs space in their warehouse and turn it into a dedicated 360° product photography studio
We’d use their existing dock and warehouse systems to move pallets of HVAC product into and out of the studio
The space would serve this large HVAC project now, and later be ready for their own product photography needs, with a clear equipment plan and workflow in place
They were on board, and we put a lease in place.
From the outside, the important thing is this: one well-thought-out studio setup—my primary studio in Grand Rapids plus the dedicated production studio in Caledonia—now supports high-volume 360° work for one manufacturer and sets up future product photography for another. It’s good logistics, good business, and good use of space.
Planning the Project Before I Took a Single Frame
My background isn’t just “show up and shoot.” I care a lot about workflow, systems, and repeatability. On a project like this, that matters just as much as choosing the right lens.
Before I set up a single light stand, I focused on planning.
1. Understanding the product list
I started with the SKU list and worked closely with their team to understand:
How products were grouped (families, series, sizes)
Which SKUs were highest priority (high volume, high visibility, or both)
Where there were existing gaps in imagery
That helped us decide:
Which products absolutely needed 360° spins
Where high-quality stills alone were sufficient
How to batch similar products together so we weren’t reinventing the wheel every day
2. Estimating time and capacity honestly
I built a realistic model of what a “full day” on this project looks like:
Average number of SKUs I could photograph per day
Time required for 360° capture, stills, assembly, and retouching
How many “odd” or challenging products would slow things down
Number of SKUs that required assembly/disassembly
Number of “Kits” which require a different approach for capture/retouching
From that, we arrived at a timeline that was ambitious but honest. It also accounted for:
File management
Backups
Export and delivery
—not just the time spent pressing the shutter.
3. Designing two complementary spaces
For this project, I’m effectively working out of two spaces that complement each other:
My Grand Rapids studio, where most of my commercial and product photography happens
The leased warehouse studio in Caledonia, built specifically to handle palletized shipments and high-volume 360° production
The Caledonia studio is centered around:
A Walrus 130 turntable for precise, repeatable 360° spins
A tethered camera setup dialed in for this specific project
A consistent lighting configuration built for white-on-white HVAC pieces
A workstation that ties directly into my folder structure and backup system
The goal is simple: each product arrives into a known, controlled environment where the variables are minimized and the system does most of the heavy lifting.
Building a file structure that can handle 1,700 SKUs
On a project this size, sloppy file management will sink you faster than bad lighting. I wanted a structure where:
Each SKU has its own dedicated top-level folder
Every SKU folder has the same internal layout
The SKU number itself drives folder names and filenames from start to finish
For each product, the folder tree looks like this (using 810000112 as an example):
/810000112/
1-Import/
810000112/
810000112-001.JPG
810000112-002.JPG
…
2-Export/
810000112/
810000112-001.JPG
810000112-002.JPG
…
3-Video/
810000112-Spin.mp4 (or similar)
Everything starts in 1-Import, where the tethered captures land. Once a 360° spin and the stills are retouched and approved, the finished files are copied to 2-Export using the exact same structure and filenames—same SKU folder, same 001–045 sequence.
That approach keeps a few things very simple:
Building 360° spin files is straightforward because the frames are always sequentially numbered and live in a predictable place
The client’s team always knows that “Import” is raw capture and “Export” is production-ready, without having to interpret version names
If we ever need to go back to the original capture, it’s one click away in the matching Import folder
It’s not glamorous, but this mirrored Import/Export structure is exactly what makes high-volume 360° product photography sustainable and keeps tens of thousands of files from turning into a maze.
A day in the workflow (high-level)
I’ll save the deeper technical details for Part 2, but at a high level, a typical SKU moves through the workflow like this:
Product check-in
Product arrives on a pallet and is matched to its SKU
Folder is created, barcode scanned, and naming template set
Prep and staging
Dust, fingerprints, grease, and packaging residue removed
Product placed on the turntable, leveled, and supported or suspended as needed
360° spin capture
45 images captured around the full rotation
Tethered capture so every frame is visible and reviewable immediately
Still images
Key hero and detail angles captured for web, marketing, and print
Quality control
Quick check for focus, alignment, reflections, background cleanliness, and any assembly issues
Re-shoots done on the spot if needed (much better than discovering issues later)
Retouching and export
Fishing line, supports, labels, and small distractions removed
Final images exported into the correct 2-Export folders
4K “safety” spin video recorded and stored in the 3-Video folder
Now multiply that by 20–30 SKUs per day and stretch it across months. That’s why the plan matters.
Early wins and lessons from the first few hundred SKUs
On a project this large, you quickly figure out what actually works. A few early wins:
The SKU and barcode-driven workflow has been huge for keeping everything organized and reducing naming errors
The lighting design for this project has been very stable; I rarely need major adjustments, which helps keep the look consistent across thousands of frames
A daily color check and a quick round of test shots have kept the output steady from day to day, even as the project stretches on
There have been challenges, too:
Some products arrive with incomplete or confusing labels
Odd shapes and highly reflective parts occasionally need extra attention
Staying mentally sharp and detail-oriented across this volume of work takes intention
But that’s exactly why I’m writing about it. If you’re a manufacturer or marketing team staring at a backlog of products that need proper images, I want you to know it’s possible—with the right planning, systems, and expectations.
Why this matters beyond HVAC
You don’t need to be in the HVAC world for this to be relevant. The same principles apply if you’re working with:
Industrial or OEM components
Hardware and building materials
Consumer products with large SKU counts
The core idea is the same:
High-volume product photographyisn’t just about taking pictures
It’s about building a system that can handle volume without sacrificing quality
Consistent, accurate images pay off everywhere—website, retailer listings, catalogs, sales tools, and beyond
If your products are being sold across multiple retailers and distributor sites anywhere in the U.S., investing in clean, consistent product imagery is one of the most practical levers you can pull.
What’s next: Part 2 – The setup and the tech
In Part 2, I’ll dig into the technical side of this project:
The studio layout in the Caledonia warehouse space
The lighting I’m using and why
The camera, lens, and tethered-capture setup
How the 360° spin workflow is structured from capture through export and delivery
If you’re a manufacturer, distributor, or marketing team looking at a large product library that needs to be photographed—or you’re wondering whether 360° product photography actually makes sense for your catalog—I’m always happy to talk through what’s realistic and what will actually help your business.